TensorRT ONNX YOLOv3
Quick link: jkjung-avt/tensorrt_demos
2020-06-12 update: Added the TensorRT YOLOv3 For Custom Trained Models post.
2020-07-18 update: Added the TensorRT YOLOv4 post.
I wrote a blog post about YOLOv3 on Jetson TX2 quite a while ago. As of today, YOLOv3 stays one of the most popular object detection model architectures. Since NVIDIA already provided an Object Detection With The ONNX TensorRT Backend In Python (YOLOv3) sample code, I just adapted the sample with my “tensorrt_demos” camera/video input code and created a real-time TensorRT YOLOv3 object detector demo: Demo #4: YOLOv3.
Reference
- Official TensorRT sample: “yolov3_onnx”. The source code (including a README.md) could be found on Jetson platforms at “/usr/src/tensorrt/samples/python/yolov3_onnx”.
- TensorRT/YoloV3 FAQ
- Official documentation of TensorRT Python API
- Official documentation of TensorRT Onnx Parser
- Official PyCUDA documentation
How to Run the Demo
For running the demo on Jetson Nano/TX2, please follow the step-by-step instructions in Demo #4: YOLOv3. The steps mainly include: installing requirements, downloading trained YOLOv3 and YOLOv3-Tiny models, converting the downloaded models to ONNX then to TensorRT engines, and running inference with the converted engines.
Note that this demo relies on TensorRT’s Python API, which is only available in TensorRT 5.0.x+ on Jetson Nano/TX2. So you’ll have to set up the Jetson Nano/TX2 with JetPack-4.2+. To re-iterate, JetPack-3.x won’t cut it.
In addition, the “trt_yolo.py” demo requires the python3 “pycuda” package. Since sudo pip3 install pycuda always failed on my Jetson’s, I created this install_pycuda.sh to install it from source.
After downloading darknet YOLOv3 and YOLOv3-Tiny models, you could choose one of the 5 supported models for testing: “yolov3-tiny-288”, “yolov3-tiny-416”, “yolov3-288”, “yolov3-416”, and “yolov3-608”. I recommend starting with “yolov3-416” since it produces roughly the same detection accuracy as the larger “yolov3-608” but runs faster.
About “download_yolov3.py”
The download_yolov3.py script would download trained YOLOv3 and YOLOv3-Tiny models (i.e. configs and weights) from the original YOLO: Real-Time Object Detection site. These models are in darknet format and provided by the original author of YOLO/YOLOv2/YOLOv3, Joseph Redmon. Kudos to Jospeh!
The downloaded YOLOv3 model is for 608x608 image input, while YOLOv3-Tiny for 416x416. But we could convert them to take different input image sizes by just modifying the width and height in the .cfg files (NOTE: input image width/height would better be multiples of 32). I already did that in the “download_yolov3.sh” script. You could read the script for details.
About “yolo_to_onnx.py”
First note this quote from the official TensorRT Release Notes:
Deprecation of Caffe Parser and UFF Parser - We are deprecating Caffe Parser and UFF Parser in TensorRT 7. They will be tested and functional in the next major release of TensorRT 8, but we plan to remove the support in the subsequent major release. Plan to migrate your workflow to use tf2onnx, keras2onnx or TensorFlow-TensorRT (TF-TRT) for deployment.
So going forward, using ONNX as the intermediate NN model format is definitely the way to go.
My yolo_to_onnx.py is largely based on the original “yolov3_onnx” sample provided by NVIDIA. NVIDIA’s original code needed to be run with “python2”. I made necessary modifications so that it could be run with “python3”. In addition, I added code to handle different input image sizes (288x288, 416x416, or 608x608) as well as support of “yolov3-tiny-xxx” models.
About “onnx_to_tensorrt.py”
The onnx_to_tensorrt.py is pretty straightforward. It just calls standard TensorRT APIs to optimize the ONNX model to TensorRT engine and then save it to file.
NVIDIA’s original sample code builds default (FP32) TensorRT engines. I added the following line of code so I’d be testing FP16 (less memory consuming and faster) TensorRT engines instead.
builder.fp16_mode = True
About “trt_yolo.py”
My trt_yolo.py is very similar to my previous TensorRT demo, trt_ssd.py. I took the “preprocessing” and “postprocessing” code from NVIDIA’s original “yolov3_onnx” sample and encapsulated them into the “TrtYOLO” class. When run, the code would: (1) deserialize/load the TensorRT engine, (2) manage CUDA memory buffers using “pycuda”, (3) preprocess input image, run inference and postprocess YOLOv3 detection output. You could read source code for details.
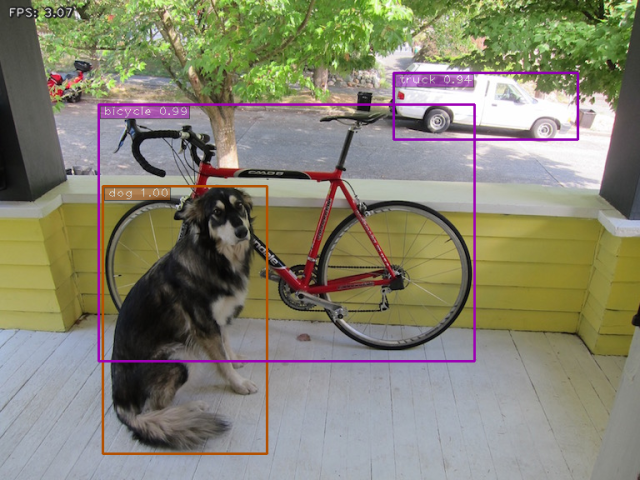
I tested the TensorRT optimized “yolov3-416” model with the “dog.jpg” (with a dog, a bicycle and a truck) from the original YOLOv3 web site, and the model successfully detected all 3 target objects as expected.
As stated in README.md, I also verified mean average precision (mAP, i.e. detection accuracy) of the optimized YOLOv3 models with COCO “val2017” data. The results, e.g. yolov3-416 “mAP @ IoU=0.5:0.95” = 0.373, were good. However, the “yolov3-608” and “yolov3-416” TensorRT engines did run much slowlier than the TensorRT SSD engines in my previous demo example.
Optimizing the postprocessing function
As I’ve shared on NVIDIA Developer forum: link and link. The implementation of postprocessing function in NVIDIA’s original “yolov3_onnx” sample is not efficient, and thus causes the sample code to run very slowly.
More specifically, the original sample code calculates element-wise “sigmoid” and “exponential” of a vector (numpy array) with the following.
    def sigmoid(value):
        """Return the sigmoid of the input."""
        return 1.0 / (1.0 + math.exp(-value))

    def exponential(value):
        """Return the exponential of the input."""
        return math.exp(value)

    # Vectorized calculation of above two functions:
    sigmoid_v = np.vectorize(sigmoid)
    exponential_v = np.vectorize(exponential)
I replace it with the following numpy vectorized computation, and was able to speed up the postprocessing function significantly.
    def sigmoid_v(array):
        return np.reciprocal(np.exp(-array) + 1.0)

    def exponential_v(array):
        return np.exp(array)
YOLOv3-Tiny models
I added some code into NVIDIA’s “yolov3_onnx” sample to make it also support “yolov3-tiny-xxx” models. The main differences between the “tiny” and the normal models are: (1) output layers; (2) “yolo_masks” and “yolo_anchors”. You could check out my git history to find the exact changes I made in the code to support “yolov3-tiny-xxx”.
However, when I evaluated mAP of the optimized “yolov3-tiny-xxx” TensorRT engines, I found they were quite a lot worse (mAP much too low) than the regular “yolov3-xxx” engines. That why I said “I’m not sure whether the implementation is correct” in README.md. In case you manage to find the problems in my implementation, please do let me know.
Thoughts
YOLOv3 (608x608), with “mAP @ IoU=0.5” = 0.579 as reported by the original author, is a rather accurate object detection model. However, it does not run fast on Jetson Nano even when optimized by TensorRT. I think this would limit its applications in edge computing to cases where frames processed per second (FPS) requirement is low…