TensorRT YOLOv3 For Custom Trained Models
Quick link: jkjung-avt/tensorrt_demos
2021-05-13 update: I have updated my TensorRT YOLO code to make it much simpler to run custom trained DarkNet yolo models. Please refer to TensorRT YOLO For Custom Trained Models (Updated), which replaces this post.
2020-07-18 update: The descriptions in this post also apply to TensorRT YOLOv4 models. My latest code on GitHub should support custom “yolov3-tiny”, “yolov3”, “yolov3-spp”, “yolov4-tiny”, and “yolov4” models which follow the original design of the corresponsing darknet models.
Ever since I published the TensorRT ONNX YOLOv3 demo, I received quite a few questions regarding how to adapt the code to custom trained YOLOv3 models. I figured that I’d update the code to make such requests easier. So I did it. Let me explain the relevant parts of the TensorRT YOLOv3 code in this post.
About naming of the custom trained model
My tensorrt_demos code relies on cfg and weights file names (e.g. “yolov3-custom-416x256.cfg” and yolov3-custom-416x256.weights) to determine model type and the input image dimension. Here are the naming rules:
- Be sure to specify either “yolov3” or “yolov4” in the file names, i.e. model name.
- Add “-tiny” or “-spp” if the model is one of those types.
- It is OK to add some additional description in the model name.
- Be sure to end the model name with an input “dimension”. The “dimension” should be first delineated by “-“, followed by either 1 number (same “width” and “height”) or 2 numbers separated by “x” (“width” x “height”, in the illustrated order).
Here are a few examples of accepted model names:
- “yolov3-custom-416x256”
- “yolov3-spp-1class-288”
- “yolov4-tiny-multipersons-384x288”
- “yolov4-512”
- ……
How to run the updated TensorRT YOLOv3 code
The pre-trained (downloaded) YOLOv3 models are for the COCO dataset and would output 80 categories of objects. However, a YOLOv3 model trained with custom datatset usuaully has a different number of object categories. To cope with this, I’ve modified the TensorRT YOLOv3 code to take “–category_num” as a command-line option.
Based on my original step-by-step guide of Demo #4: YOLOv3, you’d need to specify “–category_num” when building TensorRT engine and doing inference with your custom YOLOv3 model.
For example, if your custom trained YOLOv3 model is with only 1 category, you’d do the following. Note that “–category_num” is used at 2 places.
### Installation of "pycuda" and "onnx" (still required) omitted here
$ cd ${HOME}/project/tensorrt_demos/yolo
$ python3 yolo_to_onnx.py -m yolov3-custom-416 --category_num 1
$ python3 onnx_to_tensorrt.py -m yolov3-custom-416 --category_num 1
$ cd ${HOME}/project/tensorrt_demos
$ python3 trt_yolo.py --image for_testing.jpg \
                      -m yolov3-custom-416 --category_num 1
YOLOv3 output shapes
For those of you who want to learn the underlying details of “–category_num” and the related source code, please read on.
First, check out this very nice article which explains the YOLOv3 architecture clearly: What’s new in YOLO v3? Shown below is the picture from the article, courtesy of the author, Ayoosh Kathuria.
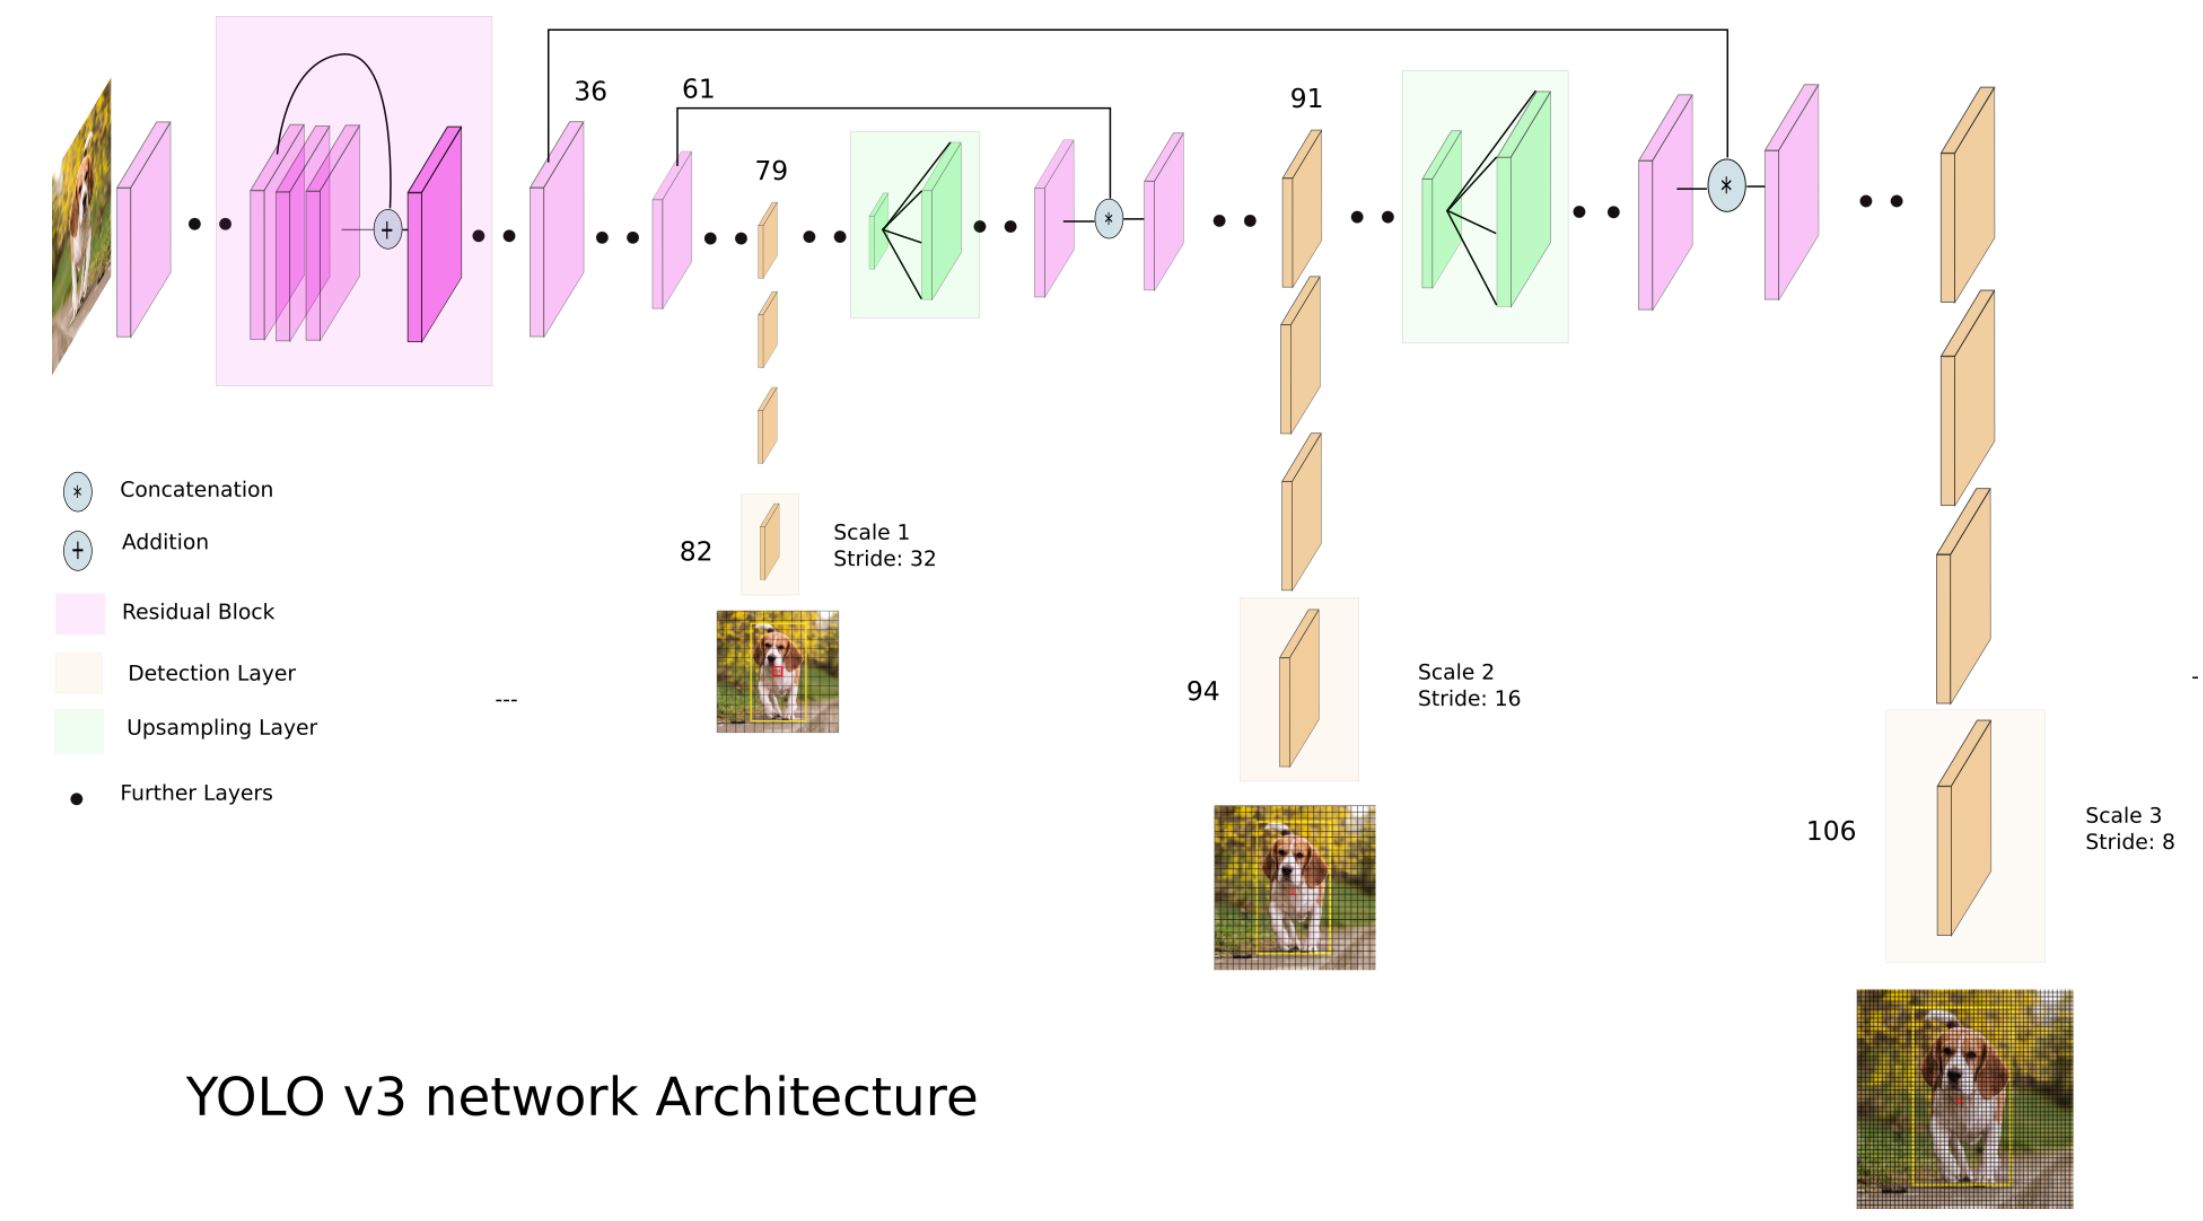
In short, the YOLOv3 model outputs detection results in 3 scales. The outputs are at layers #82, #94 and #106, with spatial dimensions of the original image height/width divided by 32, 16 and 8 respectively. Furthermore, the number of channels in the outputs is (B * (4 + 1 + C)), where B is “number of anchor boxes per grid”, 4 is “number of bounding box regression (x, y, w, h) values”, 1 is for “confidence score of objectness”, and C is the “number of object categories”. For the COCO dataset with C=80 (object categories) and B=3 (anchor boxes per grid), the number of output channels per grid is thus (3 * (4 + 1 + 80)) = 255.
The above mentioned calculations are already implemented in the TensorRT YOLOv3 code, as shown below:
- When building the TensorRT engine:
- calculating the number of output channels: yolo/yolo_to_onnx.py, line #918
- applying spatial dimension divisors 32, 16 and 8: yolo/yolo_to_onnx.py, line #928~930
- specifying layer numbers (082, 094, 106) of the outputs: also yolo/yolo_to_onnx.py, line #928~930
c = (args.category_num + 5) * 3 if 'yolov3' in args.model: if 'tiny' in args.model: output_tensor_dims['016_convolutional'] = [c, h // 32, w // 32] output_tensor_dims['023_convolutional'] = [c, h // 16, w // 16] elif 'spp' in args.model: output_tensor_dims['089_convolutional'] = [c, h // 32, w // 32] output_tensor_dims['101_convolutional'] = [c, h // 16, w // 16] output_tensor_dims['113_convolutional'] = [c, h // 8, w // 8] else: output_tensor_dims['082_convolutional'] = [c, h // 32, w // 32] output_tensor_dims['094_convolutional'] = [c, h // 16, w // 16] output_tensor_dims['106_convolutional'] = [c, h // 8, w // 8] - When doing inference with the TensorRT engine:
- calculating the number of output channels: utils/yolo.py, line #412
- applying spatial dimension divisors 32, 16 and 8: utils/yolov3.py, line #417~419
      def _init_yolov3_postprocessor(self):
          h, w = self.input_shape
          filters = (self.category_num + 5) * 3
          if 'tiny' in self.model:
              self.output_shapes = [(1, filters, h // 32, w // 32),
                                    (1, filters, h // 16, w // 16)]
          else:
              self.output_shapes = [(1, filters, h // 32, w // 32),
                                    (1, filters, h // 16, w // 16),
                                    (1, filters, h //  8, w //  8)]
YOLOv3-Tiny models
Outputs of the YOLOv3-Tiny models are very similar to YOLOv3. The main differences are just number of output scales (2 vs. 3) and the output layers. You should be able to find such differences in the source code easily.
Feel free to let me know if some of the descriptions above are not clear enough. I’ll try to amend it accordingly. Otherwise, thanks for reading.