TensorRT UFF SSD
Quick link: jkjung-avt/tensorrt_demos

A few months ago, NVIDIA released this AastaNV/TRT_object_detection sample code which presented some very compelling inference speed numbers for Single-Shot Multibox Detector (SSD) models. (These inference time numbers include memcpy and inference, but do not include image acquisition, pre-processing, post-processing and display.)
| Model | Input Size | TRT Nano |
|---|---|---|
| ssd_inception_v2_coco (2017) | 300x300 | 49ms |
| ssd_mobilenet_v1_coco | 300x300 | 36ms |
| ssd_mobilenet_v2_coco | 300x300 | 46ms |
I really wanted to test this out on my Jetson Nano/TX2 when I saw it at the 1st glance. About a couple of weeks ago, I finally had the time to adapt the code and add it into my ‘tensorrt_demos’ repository. I integrated my camera/video input module with this TRT_object_detection code, and created Demo #3: SSD. I’d like to discuss some of the implementation details in this blog post.
Reference
- AastaNV/TRT_object_detection on GitHub
- Official documentation of TensorRT Python API
- Official documentation of Graph Surgeon
- Official TensorRT sample: Object Detection With SSD In Python
- how to write config.py for converting ssd-mobilenetv2 to uff format
- Official PyCUDA documentation
How to Run the Demo
For running the demo on Jetson Nano/TX2, please follow the step-by-step instructions in Demo #3: SSD. The steps mainly include: installing requirements, converting trained SSD models to TensorRT engines, and running inference with the converted engines.
Note that this demo relies on TensorRT’s Python API, which is only available in TensorRT 5.0.x+ on Jetson Nano/TX2. So you’ll have to set up the Jetson Nano/TX2 with JetPack-4.2+. To re-iterate, JetPack-3.x won’t cut it.
The trt_ssd.py demo requires the python3 pycuda package to run. However, on my own Jetson Nano devkit (JetPack-4.2.2), sudo pip3 install pycuda would fail due to some compilation errors. I solved the problem by building/installing pycuda from source. I put the solution in my ssd/install.sh. If you follow my steps and execute the installation script, I’d expect pycuda to be installed without problem.
I already put 4 trained tensorflow SSD models in the ssd/ directory: ‘ssd_mobilenet_v1_coco’, ‘ssd_mobilenet_v2_coco’, ‘ssd_mobilenet_v1_egohands’ and ‘ssd_mobilenet_v2_egohands’, so you could run the code without the hassle of downloading/training those models. You could also refer to ssd/README.md for more information about these trained models.
About ‘build_engine.py’
Applying TensorRT optimization onto trained tensorflow SSD models consists of 2 major steps. The 1st major step is to convert the tensorflow model into an optimized TensorRT ‘engine’. And the 2nd major step is to use the TensorRT ‘engine’ to do inferencing. In this section, I’m going to discuss the conversion of TensorRT engine.
In this trt_ssd demo, we start with trained tensorflow SSD models in ‘frozen inference graph (pb)’ format. We convert the pb files into UFF, an intermediate file format defined by TensorRT. Then we let TensorRT run its optimization procedure and create the fastest ‘engine’ for the model on the target Jetson Nano/TX2 platform.
NOTE: The UFF converter library might have dependencies on certain version of tensorflow. For example, the version number of UFF converter I tested on Jetson Nano was 0.6.3. When it was executed, it printed out this message: “UFF has been tested with tensorflow 1.12.0. Other versions are not guaranteed to work.” I was actually using tensorflow 1.12.2, and it appeared to work OK.
NVIDIA has provided an executable program for converting a tensorflow pb file to UFF: /usr/lib/python3.?/dist-packages/uff/bin/convert_to_uff.py on Jetson Nano/TX2. For example, referring to sampleUffSSD/README.md, you could do it by:
$ python3 convert-to-uff.py frozen_inference_graph.pb -O NMS -p config.py
I did not use convert-to-uff.py though. I followed the ‘TRT_object_detection’ sample and integrated UFF conversion directly into my build_engine.py.
In short, my build_engine.py implemented the following functionalities:
- Load the tensorflow frozen inference graph (pb) file with graphsurgeon’s
DynamicGraphAPI. - Replace/merge unsupported layers using TensorRT plugins, by calling graphsurgeon’s
creat_plugin()andcollapse_namespaces()APIs. Note that all required TensorRT plugins for SSD models have been provided by NVIDIA. Most of them, such as ‘GridAnchor_TRT’ and ‘NMS_TRT’, are already installed alongside TensorRT 5.x libraries, while ‘FlattenConcat_TRT’ needs to be explicitly loaded fromlibflattenconcat.sousing python ‘ctypes’. - Save the resulting model as a
tmp_v?_xxxx.ufffile. Also save atmp_v?_xxxx.pbtxtfile for debugging. - Create the TensorRT engine from UFF by calling the
build_cuda_engine()API. Note that this call would take a rather long time to finish. During the process, TensorRT would print a lot of timing related messages. My guess is that, with user-specified maximum batch size and limit on memory footprint (max_workspace_size), TensorRT tries out various CUDA kernels and measures execution times for a given layer in the graph/model, and find the most efficient (or simply, the fastest) one to put into the final engine. - Serialize (i.e. save) the optimized TensorRT engine/model as a
xxx.binfile.
About ‘trt_ssd.py’
After an SSD model has been optimized and saved as a serialized TensorRT engine file, trt_ssd.py could directly load it into GPU memory for use without going through the optimization/timing step again.
My trt_ssd.py implementation mostly just followed what has been done in NVIDIA’s TRT_object_detection sample code. I created a TrtSSD class to encapsulate the code that: (1) deserializes/loads the TensorRT engine, (2) manages CUDA memory buffers, (3) pre-processes input image, runs inference and post-processes detection output. Aside from __init__(), the TrtSSD class only needs to expose a detect() function, which I think makes the code easy to read and maintain.
Same as my previous TensorRT demos, GoogLeNet and MTCNN, I hooked up my camera/image input code with the TrtSSD inferencing code. So I could easily test the TensorRT engines with files or camera inputs. As I already stated in the GitHub README, the optimized ‘ssd_mobilenet_v1_coco’ (90 classes) model runs at 22.8 FPS on my Jetson Nano, which is really good. And the optimized ‘ssd_mobilenet_v1_egohands’ (1 class) model runs even faster, at 27~28 FPS.
Additional Notes
-
Source code of the additional plugin,
libflattenconcat.so, could be found in this official TensorRT sample:/usr/src/tensorrt/samples/python/uff_ssdon Jetson Nano/TX2. Referring toREADME.mdin that directory, you could build this plugin by yourself by following thecmakeandmakesteps. -
If you train your own SSD model with TensorFlow Object Detection API and would like to use
build_engine.pyandtrt_ssd.pyto optimize/run the model, these are the things you’d need to add or check:- Export the trained model to a frozen inference graph (pb) file. You could reference my hand_detection_tutorial/export.sh for how to do that.
- Add the new model into
MODEL_SPECSin build_engine.py. - Note that, when I trained my egohands models, I set
ssd_anchor_generator’smin_sizeto 0.05 as an attempt to train the model to detect smaller objects (hands). Refer to this line in ssd_mobilenet_v2_egohands.config as an example. If you have a different setting ofmin_sizein the model config file, be sure to set the correct value in your ownMODEL_SPECS. - Also pay special attention to
input_orderin the previous 2 steps. You could runbuild_engine.pyonce frist, then verify it by checking the generatedtmp_v?_xxxx.pbtxtdebug file. More specifically, look at the ‘NMS’ node in the pbtxt file and verify the order of its 3 input tensors. - TensorFlow Object Detection API changes its model namespaces or node names from version to version. For example, namespace ‘MultipleGridAnchorGenerator/Concatenate’ in some earlier version has been simplified to just ‘Concatenate’ in later versions. If
build_engine.py(builder.build_cuda_engine(network)) throws out some ERROR and fails to generate the TRT engine for your model, I’d also suggest you to check outtmp_v?_xxxx.pbtxtto see what the error might be. - Add your custom classes list into utils/ssd_classes.py.
- Add your TensorRT engine into
SUPPORTED_MODELSin trt_ssd.py.
Then, you should be able to build the engine and do inferencing with
trt_ssd.pyfor your own SSD model. -
When I tested the optimized ‘ssd_mobilenet_v1_egohands’ model with the ‘Nonverbal Communication’ YouTube video, the detection results did not look very accurate. So I tested the same model with a few more images, including the previous photo of my son’s hands. When I compared the test results, the TensorRT optimized model seemed to perform similarly to the original tensorflow SSD model in this regard. So I’m inclined to think that the bad result on the ‘Nonverbal Communication’ video was mostly due to insufficient coverage of hands in different gestures and in different camera angles of the original ‘egohands’ training dataset. I might find time to do a more detailed study on ‘how much accuracy (mAP) drop of the SSD model could be caused by the TensorRT’s optimization (including FP16 approximation) process’ later on.
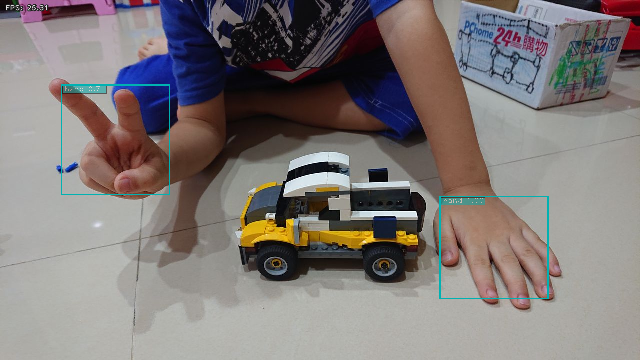
Here’s a screenshot of UFF TensorRT optimized ‘ssd_mobilenet_v1_egohands’ model running on my Jetson Nano. The detection result looked good. And it ran at ~26 FPS, which is significantly faster than TF-TRT!
One last thing… I’ve written a new post about how I improved FPS performance of this TRT SSD demo by implementing video pipeline on it. Be sure to take a look: Speeding up TensorRT UFF SSD