YOLOv4 on Jetson Nano
I’ve written about YOLOv2 and YOLOv3 before. Both of those articles were pretty popular when they were first posted. So I figured it has become somewhat of a tradition. It’s time for me to write about YOLOv4.
Here are the definitive links of YOLOv4:
-
Paper on arxiv.org: YOLOv4: Optimal Speed and Accuracy of Object Detection
-
GitHub: AlexeyAB/darknet
And below is how I installed and tested YOLOv4 on Jetson Nano. (Don’t forget to check out my new post, TensorRT YOLOv4, as well.)
Prerequisite
I tested YOLOv4 on a Jetson Nano with JetPack-4.4. In order to test YOLOv4 with video files and live camera feed, I had to make sure opencv installed and working on the Jetson Nano. I just used the stock opencv-4.1.1 in JetPack-4.4. Reference: JetPack-4.4 for Jetson Nano.
Step-by-step
Installation of YOLOv4 on Jetson Nano was actually very straightforward. Basically I just cloned the darknet code from GitHub and followed the instructions in the 2. How to compile on Linux -> Using make section of the README.
-
Clone the latest darknet code from GitHub.
$ cd ${HOME}/project $ git clone https://github.com/AlexeyAB/darknet.git $ cd darknet -
Modify the first few lines of “Makefile” as follows. Note that CUDA architecture of Jetson Nano is “53”, while TX2 “62” and AGX Xavier “72” (Reference: “CUDA-Enabled Jetson Products” section of this page).
GPU=1
CUDNN=1
CUDNN_HALF=1
OPENCV=1
AVX=0
OPENMP=1
LIBSO=1
ZED_CAMERA=0
ZED_CAMERA_v2_8=0

......

USE_CPP=0
DEBUG=0

ARCH= -gencode arch=compute_53,code=[sm_53,compute_53]
Here’s my modified Makefile, for reference.
-
Build the code with “make”. The executable, “darknet”, should be generated when done.
$ make -
I tested YOLOv4 (416x416) with the COCO pre-trained weights on the famous “dog.jpg”. Note that I modified both
widthandheightto 416 in the .cfg file for this testing.### ### Set Jetson Nano to max performance mode $ sudo nvpmodel -m 0 $ sudo jetson_clocks ### ### Download the pre-trained weights and run YOLOv4 $ cd ${HOME}/project/darknet $ wget https://github.com/AlexeyAB/darknet/releases/download/darknet_yolo_v3_optimal/yolov4.weights \ -q --show-progress --no-clobber ### ### Modify width/height in cfg and save it as yolov4-416.cfg $ cat cfg/yolov4.cfg | sed -e '7s/width=608/width=416/' | \ sed -e '8s/height=608/height=416/' > \ cfg/yolov4-416.cfg ### ### First test the model with the jpg image $ ./darknet detector test cfg/coco.data \ cfg/yolov4-416.cfg \ yolov4.weights \ data/dog.jpg \ -gpus 0Then I also tested the model with this YouTube video. More specifically, I saved the video as “traffic.mp4” and ran the following command. And I got 1.1 frames per second, while the object detection results looked good.
### Run the Darknet YOLOv4-416 model
$ ./darknet detector demo cfg/coco.data \
                          cfg/yolov4-416.cfg \
                          yolov4.weights \
                          traffic.mp4 \
                          -gpus 0
 CUDA-version: 10020 (10020), cuDNN: 8.0.0, CUDNN_HALF=1, GPU count: 1
 CUDNN_HALF=1
 OpenCV version: 4.1.1
Demo
 0 : compute_capability = 530, cudnn_half = 0, GPU: NVIDIA Tegra X1
net.optimized_memory = 0
mini_batch = 1, batch = 8, time_steps = 1, train = 0
   layer   filters  size/strd(dil)      input                output
   0 conv     32       3 x 3/ 1    416 x 416 x   3 ->  416 x 416 x  32 0.299 BF
   ......
   ......
FPS:1.1          AVG_FPS:1.1
Objects:

truck: 95%
......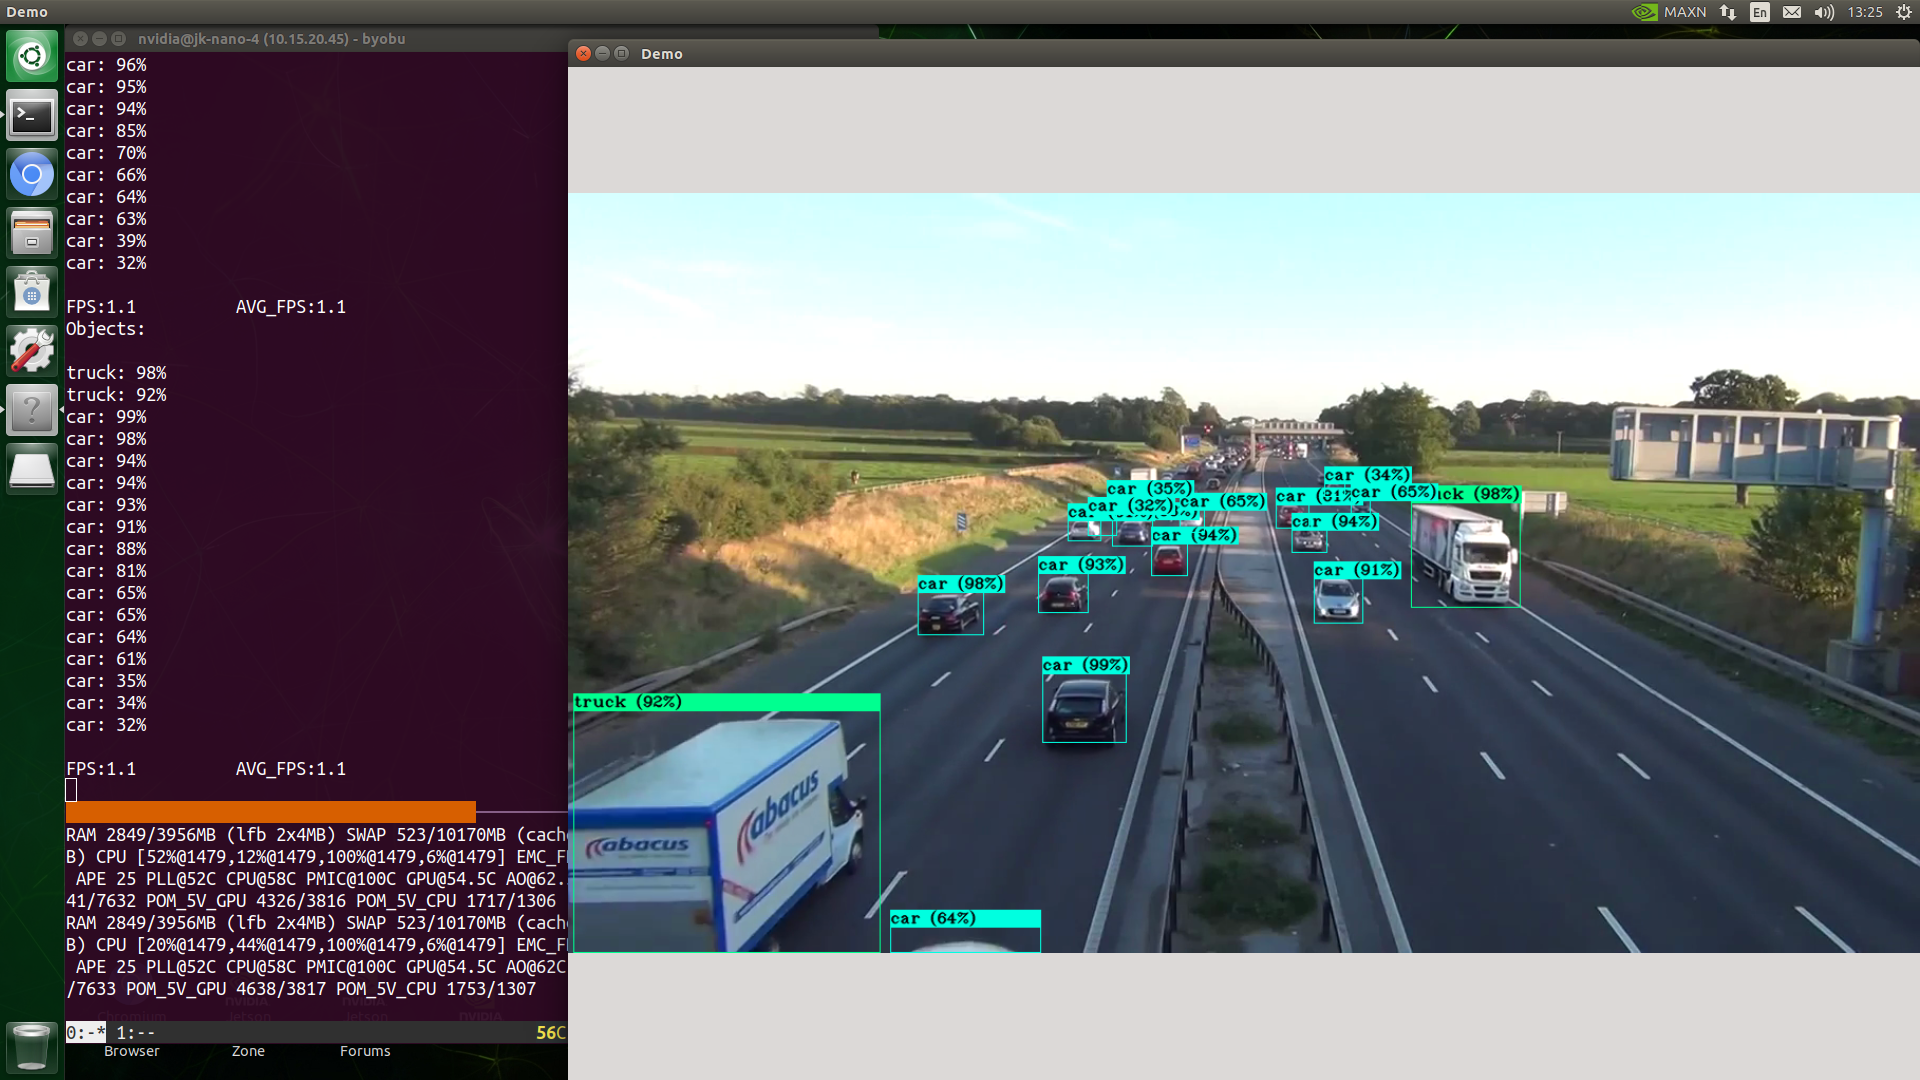
-
I also tested YOLOv4 with live video feed from a USB webcam. The result was similar at 1.1 fps. Note in the command below, the
-c 0means using the camera (V4L2) device at/dev/video0.$ ./darknet detector demo cfg/coco.data \ cfg/yolov4-416.cfg \ yolov4.weights \ -c 0 \ -gpus 0
Tip: If you’d like to run “darknet” with the onboard camera (say, on Jetson TX2), refer to this Disqus post: http://disq.us/p/23l49gz.
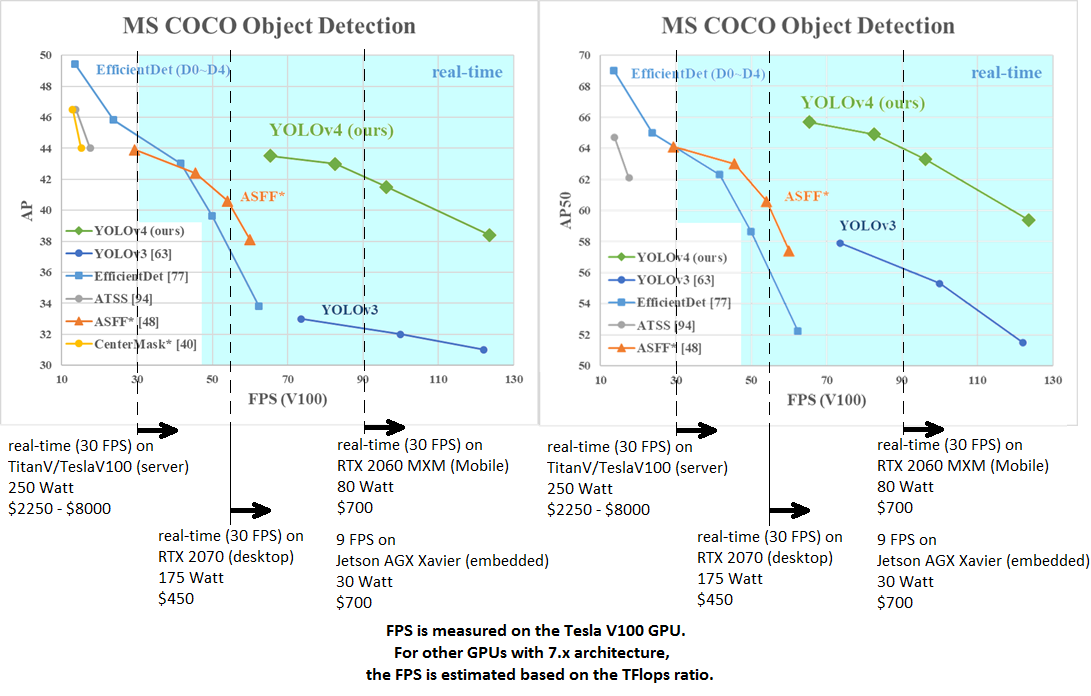
Improvements of YOLOv4 over YOLOv3 and YOLOv2
I think YOLOv4 does not require too much of an introduction. On the paper, its mAP (detection accuracy) outperforms YOLOv3 by a large margin, while its FPS (inference speed) on the Jetson platforms is roughly the same as YOLOv3. For now, I’d just close by citing the performance comparison figures in the original AlexeyAB/darknet GitHub page.