Faster R-CNN on Jetson TX2
2018-03-30 update: I’ve written a subsequent post about how to build a Faster RCNN model which runs twice as fast as the original VGG16 based model: Making Faster R-CNN Faster!
In my opinion Faster R-CNN is the ancestor of all modern CNN based object detection algorithms. It is not as fast as those later-developed models like YOLO and Single Shot Multibox Detector (SSD), but it’s probably still the most accurate among those variants.
I started using Faster R-CNN on Jetson TX2 quite a while ago, and have since developed good understanding about it. In this post I’m sharing how to install Faster R-CNN, as well as how to do real-time object detection with a pre-trained Faster R-CNN model on JTX2.
Prerequisite:
Note that the py-faster-rcnn code only works with python2 so the descriptions below are all towards python2.
- Build and install opencv-3.4.0, and make sure its python2 bindings are working properly. You can reference my How to Install OpenCV (3.4.0) on Jetson TX2 post.
- Install all dependencies required for Caffe. You can refer to my How to Install Caffe and PyCaffe on Jetson TX2 post for details. Just replace all
pip3withpip2, andpyhton3withpyhton2. - Prepare a camera for the demo. This could be either JTX2 onboard camera, USB webcam or IP CAM. You can refer to my earlier post: How to Capture and Display Camera Video with Python on Jetson TX2
Reference:
- rbgirshick’s ‘py-faster-rcnn’ on GitHub: https://github.com/rbgirshick/py-faster-rcnn
- Caffe failed with py-faster-rcnn demo.py on TX1
Steps-by-stap:
-
Check out the code from GitHub. Note that in addition to py-faster-rcnn’s caffe we’d also need a copy of BVLC caffe since we need to copy the latest cudnn code from it.
$ cd ~/project $ git clone https://github.com/BVLC/caffe.git bvlc-caffe $ git clone --recursive https://github.com/rbgirshick/py-faster-rcnn.git $ cd py-faster-rcnn/caffe-fast-rcnn $ cp ~/project/bvlc-caffe/include/caffe/util/cudnn.hpp ./include/caffe/util/ $ cp ~/project/bvlc-caffe/src/caffe/layers/cudnn* ./src/caffe/layers/ $ cp ~/project/bvlc-caffe/include/caffe/layers/cudnn* ./include/caffe/layers/ $ cp Makefile.config.example Makefile.config -
Install additional dependencies required for the demo script (assuming all required packages for caffe have already been installed, as stated in the Prerequisite section).
$ sudo pip2 install easydict -
(Optional yet recommended) Set JTX2 to max performance mode before starting to build the code.
$ sudo nvpmodel -m 0 $ sudo ~/jetson_clocks.sh -
Modify Makefile.config as below. Or you could reference my modified Makefile.config.
- Set
USE_CUDNN := 1 - Set
OPENCV_VERSION := 3 - Add
compute_62(for TX2) andcompute_53(for TX1) intoCUDA_ARCH - Replace python2.7 numpy include path with
/usr/local/lib/.....(since I usedpip install numpyto install the latest version of numpy) - Set
WITH_PYTHON_LAYER := 1 - Add
/usr/include/hdf5/serialintoINCLUDE_DIRS - Add
/usr/lib/aarch64-linux-gnuand/usr/lib/aarch64-linux-gnu/hdf5/serialintoLIBRARY_DIRS
- Set
-
Remove line #11 (
#include "caffe/vision_layers.hpp") ofpy-faster-rcnn/caffe-fast-rcnn/src/caffe/test/test_smooth_L1_loss_layer.cpp(reference). Build and test caffe.$ cd ~/project/py-faster-rcnn/caffe-fast-rcnn $ make -j4 all pycaffe ### Testing is optional. In fact, some test would probably fail due to ### JTX2 running out of memory. And that is OK. $ make -j4 test $ make runtest -
Modify line #135 of
py-faster-rcnn/lib/setup.pyby replacingsm_35withsm_62(this corresponds to TX2’s CUDA architecture). Then build the Cython module.$ cd ~/project/py-faster-rcnn/lib $ make
Here, installation of Faster R-CNN is complete. We would download the pre-trained Faster R-CNN object detector model, as well as the demo_camera.py script. Note the pre-trained model was trained with Pascal VOC 2007 dataset and could detect 20 classes of objects. Finally we could run the demo script and check the result.
   $ cd ~/project/py-faster-rcnn
   $ ./data/scripts/fetch_faster_rcnn_models.sh
   $ wget https://raw.githubusercontent.com/jkjung-avt/py-faster-rcnn/master/tools/demo_camera.py -O tools/demo_camera.py
   ### By default the demo script uses JTX2 onboard camera, read the
   ### help message for details.
   $ python2 tools/demo_camera.py --help
   ### To run the demo script with USB webcam (/dev/video1), try the
   ### following.
   $ python2 tools/demo_camera.py --usb
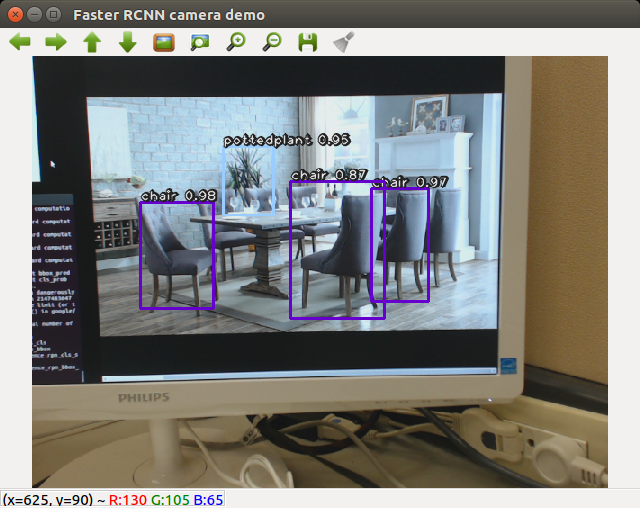
Here’s a screenshot of demo_camera.py running on my JTX2. It’s not fast (took roughly 0.9 second to process 1 image), but works.