Setting up Jetson Xavier NX
Last year, I wrote about Setting up Jetson Nano: The Basics. In this post, I’m going to do a tutorial about how to set up the Jetson Xavier NX DevKit and test TensorRT inferencing on it. As of the time of this writing, JetPack-4.4 is the official SDK for Jetson Xavier NX. So the content of this post could overlap with my previous post, JetPack-4.4 for Jetson Nano, quite a bit. Nonetheless, the concepts mentioned in the 2 iabove-mentioned blog posts should apply to Jetson Xavier NX as well. I’d suggest you to check out those 2 posts if you find something not clear enough in this post.
1. Basic set-up of Jetson Xavier NX
According to NVIDIA’s official documentation, a microSD card is required to store the boot image and root filesystem for Jetson Xavier NX. Please refer to Getting Started With Jetson Xavier NX Developer Kit to prepare the microSD card.
After inserting the microSD card and booting up Jetson Xavier NX with the image, I’d finish Ubuntu set-up process and, for simplicity, create an account named “nvidia” (you could use whatever account name you’d like). The initial set-up would take a few minutes, and Jetson Xavier NX would reboot itself. Afterwards, I’d make sure internet connection was set up and working OK on the DevKit.
Note: For some reason, the Jetson Xvaier NX got stuck in Linux kernel booting process the 1st time. I had just to power-cycled it and Linux kernel boot up OK the 2nd time around.
Tip #1: When the Jetson Xavier NX boot up to Desktop, I would hit Ctrl-Alt-T to bring up a terminal and then lock the terminal on the Launcher (on the left-hand side).
Tip #2: In the command terminal, I would type and execute “chromium-browser” to bring up the web browser. Again, I would lock it onto Launcher for easier use later on.
Then I’d run the following commands to set up CUDA related environment variables properly.
$ sudo apt update
###
### Set proper environment variables
$ mkdir ${HOME}/project
$ cd ${HOME}/project
$ git clone https://github.com/jkjung-avt/jetson_nano.git
$ cd jetson_nano
$ ./install_basics.sh
$ source ${HOME}/.bashrc
Note that a swap partition of 2GB was already created by JetPack-4.4 on the Jetson Xavier NX DevKit, so I did not need to manually create another swap file.
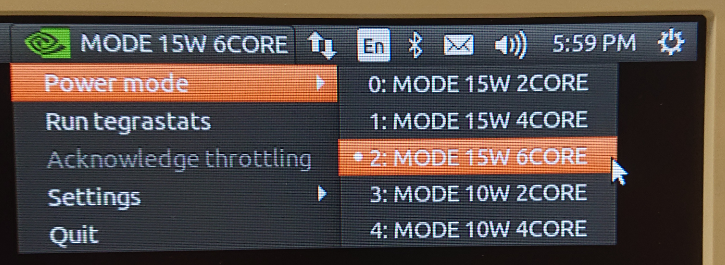
I’d also set Jetson Xavier NX to “15W 6CORE” power mode with maximum CPU clock speeds, so that the following installation steps could run faster.
$ sudo nvpmodel -m 2
$ sudo jetson_clocks
By the way, an alternative way to set Xavier NX power mode is to mouse-click power mode options on the top-right corner of the Ubuntu desktop.
2. Making sure python3 “cv2” is working
I’d just use the built-in OpenCV-4.1.1 in JetPack-4.4 (no need to build from source by myself). I’d do the following for system library dependencies and python module dependencies. NOTE: For “protobuf” libraries, instead of doing apt install, I recommend installing the newer version (3.8.0) using my “install_protobuf-3.8.0.sh” script as shown below. The “protobuf” libraries could have a noticeable effect on the performance (inference speed) of tensorflow or else. The building/installation process of “protobuf” could take a couple of hours, though. So be patient…
### Install dependencies for python3 "cv2"
$ sudo apt update
$ sudo apt install -y build-essential make cmake cmake-curses-gui \
                      git g++ pkg-config curl libfreetype6-dev \
                      libcanberra-gtk-module libcanberra-gtk3-module \
                      python3-dev python3-pip
$ sudo pip3 install -U pip==20.2.1 Cython testresources setuptools
$ cd ${HOME}/project/jetson_nano
$ ./install_protobuf-3.8.0.sh
$ sudo pip3 install numpy==1.16.1 matplotlib==3.2.2
Then I’d test my tegra-cam.py script with a USB webcam, and make sure the python3 “cv2” module could capture and display images properly.
### Test tegra-cam.py (using a USB webcam)
$ cd ${HOME}/project
$ wget https://gist.githubusercontent.com/jkjung-avt/86b60a7723b97da19f7bfa3cb7d2690e/raw/3dd82662f6b4584c58ba81ecba93dd6f52c3366c/tegra-cam.py
$ python3 tegra-cam.py --usb --vid 0
3. Installing tensorflow-1.15.2
Reference (official documentation from NVIDIA): Installing TensorFlow For Jetson Platform
At the time of this writing, NVIDIA has provided pip wheel files for both tensorflow-1.15.2 and tensorflow-2.2.0 (link). I used 1.15.2 since my TensorRT Demo #3: SSD only works for tensorflow-1.x.
To install tensorflow, I just followed instructions on the official documentation, but skipped installation of “protobuf”. (I already built and installed “protobuf-3.8.0” in the opencv section.) These steps would take roughly 20~30 minutes to finish.
$ sudo apt install -y libhdf5-serial-dev hdf5-tools libhdf5-dev zlib1g-dev \
                      zip libjpeg8-dev liblapack-dev libblas-dev gfortran
$ sudo pip3 install -U numpy==1.16.1 future==0.18.2 mock==3.0.5 h5py==2.10.0 \
                       keras_preprocessing==1.1.1 keras_applications==1.0.8 \
                       gast==0.2.2 futures pybind11
$ sudo pip3 install --pre --extra-index-url \
                    https://developer.download.nvidia.com/compute/redist/jp/v44 \
                    tensorflow==1.15.2
At this point, I’d test and make sure “import tensorflow as tf” worked OK in python3.
4. Testing TensorRT GoogLeNet and MTCNN
Please refer to my JetPack-4.4 for Jetson Nano post if you are interested in testing these 2 models. I will skip the details here to avoid repetition.
5. Testing TensorRT SSD models
Reference: Demo #3: SSD
### Install dependencies and build TensorRT engines
$ cd ${HOME}/project
$ git clone https://github.com/jkjung-avt/tensorrt_demos.git
$ cd ${HOME}/project/tensorrt_demos/ssd
$ ./install.sh
$ ./build_engines.sh
Test the TensorRT SSD models.
$ cd ${HOME}/project/tensorrt_demos
$ python3 trt_ssd_async.py --usb 0 --model ssd_mobilenet_v1_coco
$ python3 trt_ssd_async.py --usb 0 --model ssd_mobilenet_v2_coco
6. Testing TensorRT YOLOv3 and YOLOv4 models
Reference: Demo #4: YOLOv3 and Demo #5: YOLOv4
### Install dependencies and build TensorRT engine
$ sudo pip3 install onnx==1.9.0
$ cd ${HOME}/project/tensorrt_demos/plugins
$ make
$ cd ${HOME}/project/tensorrt_demos/yolo
$ ./download_yolo.sh
$ python3 yolo_to_onnx.py -m yolov3-416
$ python3 onnx_to_tensorrt.py -v -m yolov3-416
$ python3 yolo_to_onnx.py -m yolov4-416
$ python3 onnx_to_tensorrt.py -v -m yolov4-416
Test the TensorRT YOLOv3 (416x416) and YOLOv4 (416x416) models.
$ cd ${HOME}/project/tensorrt_demos
$ python3 trt_yolo.py --usb 0 -m yolov3-416
$ python3 trt_yolo.py --usb 0 -m yolov4-416