Booting Rootfs off SD Card on Jetson TX1
NVIDIA’s Jetson TX1 Evaluation Board has an eMMC of 16GB. This eMMC storage space is mostly used as Linux rootfs (/), besides BCT and U-Boot, etc. This rootfs (APP) partition gets filled up quickly after a complete installation of the JetPack. So I prefer not to develop off the eMMC rootfs partition directly.
One very nice design of NVIDIA’s Jetson TX1 platform is its U-Boot would look for Linux rootfs on SD Card (/dev/mmcblk1p1) first, and then eMMC (/dev/mmcblk0p1) , then USB. That is, if we put a working rootfs on a SD Card, we can boot TX1 off the SD Card by just plugging it in before TX1 boots. Meanwhile we can easily fall back to booting from eMMC by just removing the SD Card before TX1 boots.
So I’d build my software development environment on a larger SD Card, and let TX1 boot rootfs off it. This way, my TX1 software development process would not be limited to 16GB of rootfs and could have a much large storage space at disposal (for recording video clips, for example). One of my preferred SD Cards for this purpose is Transcend 64GB SDXC UHS-I U3 95/60 Mb/s, which provides good Read/Write speed at its price. I have a few of these SD Cards so I am able to switch among different software environments, say 1 for a particular demo and the others for development, quickly.
- http://24h.pchome.com.tw/prod/DGAG0N-A9005IG6Y
- https://www.amazon.com/Transcend-Speed-UHS-3-Memory-TS64GSDU3/dp/B00J3KA814/ref=sr_1_1?ie=UTF8&qid=1487079911&sr=8-1&keywords=transcend+64GB+SDXC+UHS-I+U3
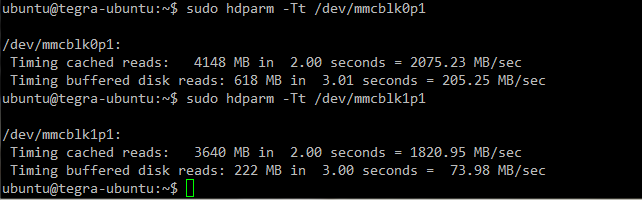
I compared ‘buffered disk reads’ between eMMC and the Transcend SD Card on Jetson TX1. The result showed Read performance of the SD Card (73.98 MB/s) is only about 1/3 comparing to eMMC (205.25 MB/s). But in practice, when I ran the Jetson TX1 off rootfs on the SD Card, the drop of rootfs Read performance seldomly posted any problem for me.
Here is my SOP of building rootfs on the SD Card.
- Do a complete installation of JetPack, say JetPack-2.3.1, on Jetson TX1. This would install everything fresh on the eMMC rootfs partition, including CUDA Toolkit, OpenCVForTegra, VisionWorks, TensorRT and Multimedia API.
- (Optional but preferred) Update all apt packages to the latest version by
sudo apt-get upgrade - Insert the SD Card onto Jetson TX1. The partition on the SD Card might be mounted automatically. I would then do: (a) un-mount and format the SD Card partition, (b) mount the SD Card partition and copy everything from eMMC rootfs to it, (c) modify boot/extlinux/extlinux.conf so that Linux would use the SD Card partition as root, (d) modify lib/init/fstab.
- Reboot Jetson TX1 with the SD Card plugged-in. If everything goes as expected, Jetson TX1 would now be using /dev/mmcblk1p1 (SD Card) as rootfs. This could be verified with either
df -h,lsblkor justmount.
Detailed shell commands for step 3 above are:
 ### Umount and format /dev/mmcblk1p1. This would clean up the partition.
 ### Run fdisk to re-partition the SD Card before formatting if necessary.
 $ sudo umount /dev/mmcblk1p1
 $ sudo mkfs.ext4 /dev/mmcblk1p1

 ### Mount the freshly formatted /dev/mmcblk1p1. The UUID would differ for
 ### your SD Card partition.
 $ sudo mount /dev/mmc1blk1p1 /media/ubuntu/9ae7c5ba-e812-445b-bfce-20f9d2ac78b6

 ### Copy all files from rootfs to /dev/mmcblk1p1, while excluding the
 ### directory /dev/mmcblk1p1 is mounted on. This step might take 10~20 min.
 $ sudo rsync -avxHAX --progress / /media/ubuntu/9ae7c5ba-e812-445b-bfce-20f9d2ac78b6/

 ### Specify "root=/dev/mmcblk1p1" (replacing /dev/mmcblk0p1) in extlinux.conf
 $ sudo vim /media/ubuntu/9ae7c5ba-e812-445b-bfce-20f9d2ac78b6/boot/extlinux/extlinux.conf

 ### Specify "/dev/mmcblk1p1" (replacing /dev/root) as the mount device
 ### for root (/) in fstab
 $ sudo vim /media/ubuntu/9ae7c5ba-e812-445b-bfce-20f9d2ac78b6/lib/init/fstab
 $ sync
Once done, I almost always use the SD Card for software development afterwards. For example, I’d install Torch7, OpenCV-3.x and other stuffs on the SD Card partition only. This way I don’t need to worry about eMMC running out of space.
One caveat worth mentioning is that there could be compatibility issue if L4T version on the SD Card partition does not match that on the eMMC. If you encounter such a problem and thus TX1 could not boot successfully off the SD Card , I’d suggest you to re-make the SD Card partition by following those steps outlined above.
Lastly, I summarize the benefits of using SD Cards as TX1 software development environments.
- Since we keep a fresh JetPack environment on the eMMC, we can always boot off eMMC and do benchmarking (or debugging). It’s much easier to determine whether a problem is cause by NVIDIA or ourselves this way.
- As mentioned earlier, we can switch between different software (or demo) environments quickly by swapping SD Cards.
- If the SD Card partition is corrupted, we can just boot from eMMC and re-make the SD Card partition. I found this quite useful when I was developing device drivers or modifying Linux kernel for TX1.
- I think the same approach also works for Jetson TK1.