Mining Ethereum on A Deep Learning PC
I have a couple of deep learning PCs at home, and they get idle (when I’m not training deep learning models) from time to time. Meanwhile, valuation of cryptocurrencies has appreciated a lot in the past year. It has become pretty profitable to do cryto mining with GPUs recently. So I decide to do some mining with my spare PCs (with NVIDIA GPUs). In this post, I’m sharing how you could also set up your deep learning PCs to mine Ethereum (ETH).
Disclaimer: Although I’ve researched this topic quite a bit, I don’t consider myself an expert of GPU mining at all. I try my best to provide accurate information in this post, but I cannot guarantee 100% correctness of the content. If you have a PC and a modern NVIDIA GPU similar to mine, most likely you should be able to follow my step-by-step guide and start mining in very little time. In all cases, please do your own homework too. As always, I welcome questions or feedbacks, so feel free to leave a comment below.
Here’s a rough spec of one of my deep learning PCs:
- A decent x86_64 PC with 32GB of RAM, running Ubuntu 20.04 LTS (Linux)
- NVIDIA GeForce RTX 2080 Ti GPU, with the latest version of NVIDIA driver (Production Branch: 460.80)
- An up-to-date version CUDA Toolkit (I use CUDA-11.3. But I think any recent versions of CUDA should be fine.)
So let’s answer this question before diving into the step-by-step guide. How profitable is it for me to mine with this PC 24 hours a day continuously?
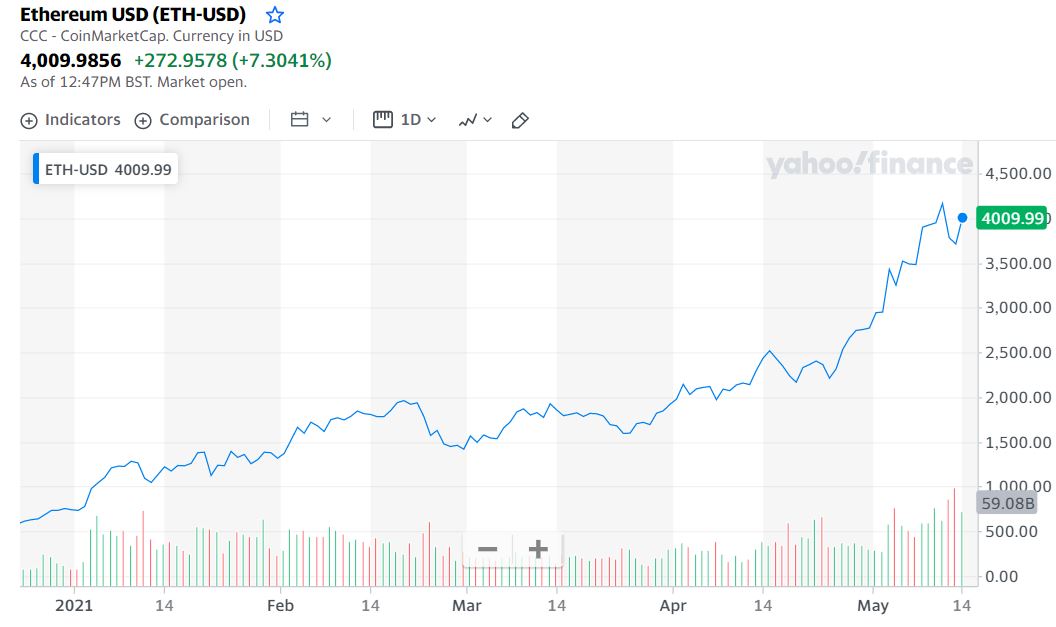
- “Ethereum”, being the 2nd most popular cryptocurrency in the world behind “Bitcoin” today, is the best cryto for mining using GPUs. (“Bitcoin” mining absolutely requires ASICs.) At the time of this writing, 1 Ethereum is at around USD 4,000.
- Referring to The Best GPUs for Mining on Kryptex, NVIDIA RTX 2080 Ti could handle ~55.5 MH/s for ETH mining. That equates to ~USD 8.03 per day currently. Note that this number depends not only on the price of Ethereum but also on “difficulty” of mining Ethereum coins. So this number fluctuates quite a lot over time.
- Electricity cost of my home in Taiwan (during summer which is the more expensive time of the year) is around USD 0.1 per kWh. And my PC probably consumes 0.25 kW per hour while mining ETH. As a result, I need to pay ~USD 0.6 per day for electricity.
- So I’m generating ~USD 7.43 per day (or ~USD 222.9 per month) of profit mining ETH with the RTX 2080 Ti PC right now. Note again this profitability number could vary quite a lot for you, especially depending on the price of Ethereum and the cost of electricity.
And here’s yet one additional note. It is essential to fine-tune “overclocking” settings of the GPU so that the GPU runs at an ideal power consumption and efficiency. When doing overclocking properly, you not only avoid overheating the GPU (thus extending its life) but also reduce the electricity cost. I will demonstrate how to achieve this in the steps below.
Step-by-step
-
You need to have an Ethereum “wallet” to store the crypto coins you have mined. If you don’t know what this is, google and learn it. I’m using maicoin.com and my “Receive ETH” address is “0xcDeF49aEAF432f5669372C076c974deAac85a97c”. You’ll need to set up your own wallet and keep record of your own “Receive ETH” address.
-
Next, you need to pick a “mining pool” to mine from. You could start with ethermine.org. Just go to the web site and select “Start Mining”. There you could find the URLs and ports of the pools. For example, since I’m in Taiwan, I’d choose the “Asia” pool. This is further explained in step #5 below.
You could certainly choose to mine from other ETH pools. Be sure to select one with lower fees. As a reference, ethermine.org charges 1%.
-
Assuming NVIDIA driver and CUDA Toolkit are already installed properly on the PC, the first step of setting up the system for mining is to set “Coolbits” on the GPU. This is required so that you could change “overclocking” setting of the GPU and achieve better mining efficiency. Refer to Basics Of Overclocking And BIOS Modding | Miners Edition and Guide: RTX (also GTX), increasing efficiency in Linux for more information.
Specifically, do the following from a terminal: (The last step would reboot the PC.)
$ sudo nvidia-xconfig --enable-all-gpus
$ sudo nvidia-xconfig --cool-bits=28
$ sudo reboot
You can check the file “/etc/X11/xorg.conf” and verify that
Option "Coolbits" "28"has been set in the"Screen"section. The “Coolbits” setting should take effect after the PC reboots. Then you can further verify that you could adjust GPU settings withsudo nvidia-smiandsudo nvidia-settingscommands. -
I have not tried many different miner software. I am using “PhoenixMiner” and am pretty satisfied with it. So I recommend it. You could download the latest version from the official site:
Just untar the file, and then you are ready to use it. There is documentation in the “doc/” subdirectory. In addition, you could also refer to online documentation or this YouTube video: How To Use Phoenixminer : Step-by-step Guide.
Note that “PhoenixMiner” charges a 0.65% developer fee, which is on the low side among all ETH mining software.
-
This is the main step. Let’s create the script for ETH mining.
There is an example “start_miner.sh” script in PhoenixMiner. You could modify it as below: (Be sure to set your own wallet address and worker name, and probably modify the mining pool URLs.)
#!/bin/bash
#
# gpu:0 is RTX 2080 Ti

set -e

sudo nvidia-smi -i 0 -pl 160

sudo nvidia-settings -a '[gpu:0]/GPUPowerMizerMode=1'
sudo nvidia-settings -a '[gpu:0]/GPUGraphicsClockOffset[4]=-200'
sudo nvidia-settings -a '[gpu:0]/GPUMemoryTransferRateOffset[4]=1100'
sudo nvidia-settings -a '[gpu:0]/GPUFanControlState=1' -a '[fan:0]/GPUTargetFanSpeed=70'

./PhoenixMiner -pool ssl://asia1.ethermine.org:5555 -pool2 ssl://us2.ethermine.org:5555 \
               -wal <YOUR WALLET ADDRESS>:<YOUR WORKER NAME>
Let me explain the details below:
- Even though “PhoenixMiner” seems to have the capability of taking command-line options and adjusting GPU overclocking settings accordingly, it just doesn’t work for me. I have to use
nvidia-smiandnvidia-settingsinstead. - I referenced miningchamber.com’s recommended overclocking settings for RTX 2080 Ti. Caution: Improper overclocking setting might overheat/damage the hardware. So be very careful when modifying the numbers.
- I set GPU power limit to 160W:
nvidia-smi -i 0 -pl 160. - I set GPU core clock to (relative) -200MHz. Note that you might need to replace
GPUGraphicsClockOffset[4]withGPUGraphicsClockOffset[3]for GTX 10X0 cards. - I set GPU memory clock to (relative) +1100MHz. Note that GPU memory clock setting is crucial to ETH mining performance. Also note that you might need to replace
GPUMemoryTransferRateOffset[4]withGPUMemoryTransferRateOffset[3]for GTX 10X0 cards. - I set GPU fan speed to 70%. With this setting, my RTX 2080 Ti GPU would be working in 60~70 degrees Celsius range.
- I use “asia1.ethermine.org” as my primary mining pool, and “us2.ethermine.org” as a backup. You should check and replace the URLs (to the mining pools which work better for you) if necessary.
- Finally, my wallet address and worker name is
0xcDeF49aEAF432f5669372C076c974deAac85a97c.home1. You should replace that with your own. (The worker could be named arbitrarily.)
With the script properly set up (might need to
chmod a+x start_miner.shto make it executable), you could start the miner with:$ ./start_miner.shIt would take a couple of minutes for PhoenixMiner to try out and find the best mining algorithm/strategy. After that, you should see stable mining outputs from the miner. I get 56~57 MH/s for RTX 2080 Ti with the mentioned set-up.
- Even though “PhoenixMiner” seems to have the capability of taking command-line options and adjusting GPU overclocking settings accordingly, it just doesn’t work for me. I have to use
-
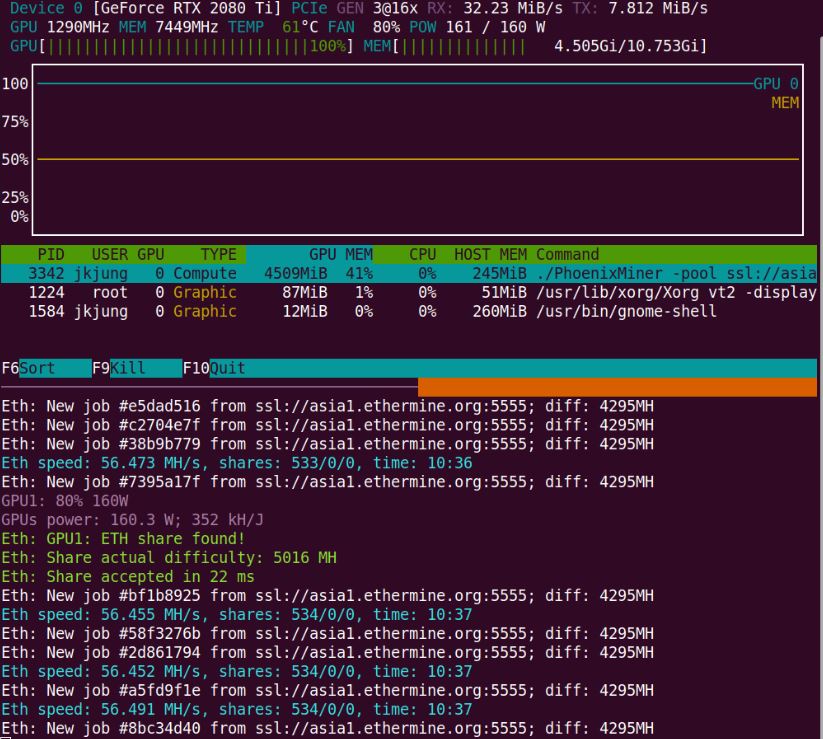
GPU status could be monitored with either
nvidia-smiornvtop. You should pay attention to power consumption and temperature of the GPU.Here’s a screenshot of my deep learning PC’s terminal, with
nvtopon the top and PhoenixMiner running at the bottom. From the screenshot, it could seen that:- My RTX 2080 Ti GPU is consuming ~160 W of power. The GPU fan is running at 80% rate. And GPU temperature is at 61 degree Celsius.
- PhoenixMiner reports that the ETH mining rate of my GPU is ~56.45 MH/s.
-
Your actual mining progress could be monitored on ethermine.org web page (or whatever mining pool you are using). Just enter your ETH wallet address in the “Miner Address” field on the page. You should see something like the following after you’ve mined for a while.
Below is an example snapshot of my ethermine.org dashboard. I have set up 2 workers (2 PCs), “home0” and “home1”, to do ETH mining. The “home0” worker is the RTX 2080 Ti PC. It reports a hashrate of 56.9 MH/s, while ethermine.org observes 62.0 MH/s from it.
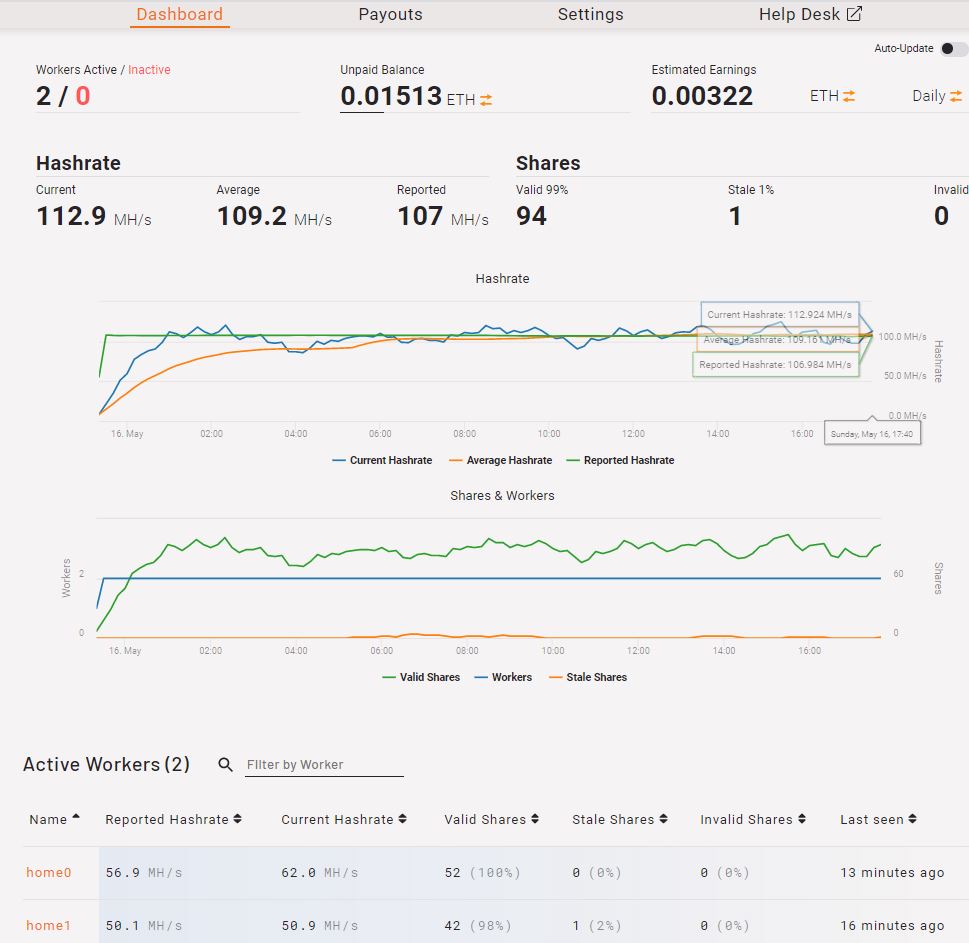
In addition to miner status, you should be able to check “Payout” schedule as well. Take my set-up as an example, if I have only 1 RTX 2080 Ti PC mining 24-hour non-stop, it would take ~16 days for me to get a payout of roughly 0.05 Ethereum coin (with fees deducted). You could check out ethermine.org’s Payout Policy here.
-
To stop mining, I’d just hit Ctrl-C to quit PhoenixMiner and reboot the PC to restore GPU to default clock settings. Then I could use the PC to train deep learning models as usual.
Reference
- A good introductory YouTube video by Mining Chamber: The ULTIMATE GUIDE For Mining Cryptocurrency With Your PC